
NDS allows you to share your report with other NDS users that are connected to your SQL Server database. This way, the report structure will be saved in the SQL Server and can be used by every user connected to the SQL Server. Every user can also create or modify the reports saved in the SQL Server.
To view, create, modify and synchronize your report you need to go to the Multi-Report form. You can open the Multi-Report from NDS Settings _ Report _ “Managing Multi-Report” button.
You can also open it from the Report screen _ “Multi-Report” button.

The Multi-Report screen shows the list of your report. Below there is an example with only one report:

In this screen you have two pages:
1. Report list on SQL Server - this page will show all the report you currently have on your SQL server database when you are connected to SQL Server.
If you are not connected to SQL Server, it will show the reports in your local database.
The list will show this reports information:
a. Name – the name of the report
b. Date – the update date of the current report
c. Default – this checkbox is selected on the “Default” report, that will open the first time over a NDS session
d. Header – where you can choose the header for the selected report
e. Banner – where you can choose the banner for the selected report
f. User ID Code – this ID Code is an unique identifier for your reports. You can set it, and this code is required for the synchronization. See below for more details.
In the right side of the screen you will have the section where you can create, edit or delete your report.
Please note that all the report on SQL Server are the same for each user connected to the SQL Server database.
2. Synchronize report (only available to SQL Server use) – in this screen you will see reports on your SQL Server database (on the left) and reports on your local database (on the right).
You have two buttons to synchronize from one database to another.
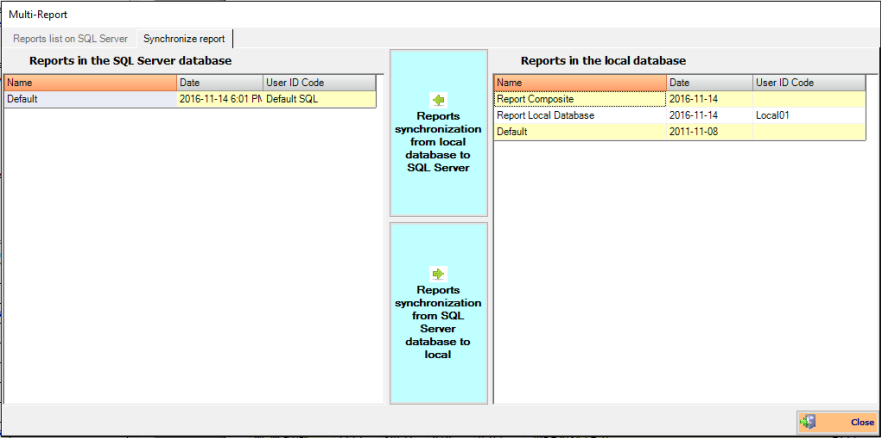
In this example, you have one report in the SQL Server database (Default), and three reports in the local database, but only one of those 3 has the User ID Code (Report Local Database).
You can change the User ID Code of report in the local database directly from this table.
This does not work for reports in SQL Server (you have to change the User ID Code from the Reports list on SQL Server page).
Important: before the synchronization
The synchronization will update your destination database with the reports data in the starting database. This will work only on reports with an associated User ID Code.
The synchronization process from local to SQL Server should be done only when you have significant changes on your local database, for example you have some new report to update to your SQL Server or when you do not have your report into your SQL Server.
This is because all the NDS users connected to SQL Server will see the changes that you made on the synchronized report.
Important: Banners and Headers are not included in the SQL Server.
The management of Headers and Banners is related to your local configuration, so every user will have his own personal header and banners.
You can set a Default header for all the reports that is shared, but the personal headers are still personal, so if one user set a personal header for one report in SQL Server, the other user may have a different header. If you need more details about this, please read the report manual.
Report Synchronization
To make the synchronization, the User ID Code is required.
First of all, you need to set the User ID Code for the report you want to synchronize.
1. To set the User ID Code for your SQL Server reports, you need to edit the report from the first page of this form (Reports list on SQL Server): click on a report, click on “Edit button”, change the User ID Code and save the report.
2. To set the User ID Code for your local database reports, you need to edit them directly from this page (Synchronize report) in the reports list: you can edit the value in the User ID Code column. After you insert a value, the value will be automatically saved.
When the User ID Code are saved, you have to click on one of the button in the middle of the screen in order to synchronize the SQL Server database or the local database.
If you need to synchronize from local to SQL Server, you need to click the first button: Reports synchronization from local database to SQL Server.
This button will synchronize only the reports with an User ID Code on your SQL Server database.
Example: if you are synchronizing a report with an User ID Code and this User ID Code already exists on one report in your SQL Server, this report will be updated, so you will not see a new report but the synchronization will update your existing one. If the User ID Code is a new code that does not exists in your SQL Server, the report will be created in your SQL Server, so you will see a new report in the list.
The same process can be done also from your SQL Server to your local database, and works in the same way.
At the end of the synchronization process, you will have the destination database updated with the report that you had in the starting database. This will work only with reports with an User ID Code.
Please note: if you edit a report on your SQL Server, all the changes you made will be saved in the SQL Server. This means that all the other users will see the changes you made after you made them.